Quickstart - MCP
Generate frontend code from Figma inside Cursor, Claude Code, Windsurf, and other MCP-compatible AI tools.
Locofy MCP (Model Context Protocol) brings Locofy's design understanding capabilities directly into AI coding tools such as Cursor, Claude Code, Windsurf, Gemini CLI, GitHub Copilot, and other MCP-compatible clients.
Instead of switching between design tools, code generators, and AI assistants, you work directly from your preferred AI development environment. This workflow is ideal for developers who want to combine Locofy's design-aware code generation with modern AI coding assistants.
Select MCP → Connect Figma → Install MCP → Generate Code → Refine with AI → Continue Development
Before you start
Copy the Figma URL of the design you want to convert—you'll include it when prompting your AI assistant.
You no longer need to manually share your Figma file with Locofy. Locofy uses your account's Figma connection to access designs. If access is needed during generation, your browser opens so you can log in and allow Figma access.

Step 1: Create your Locofy account
Go to Locofy.ai and click Get Started. You can sign up with Google, GitHub, or email, then complete onboarding (name, role, and how you plan to use Locofy).
Your Locofy account links MCP to your projects and generated code.
Step 2: Select the MCP workflow
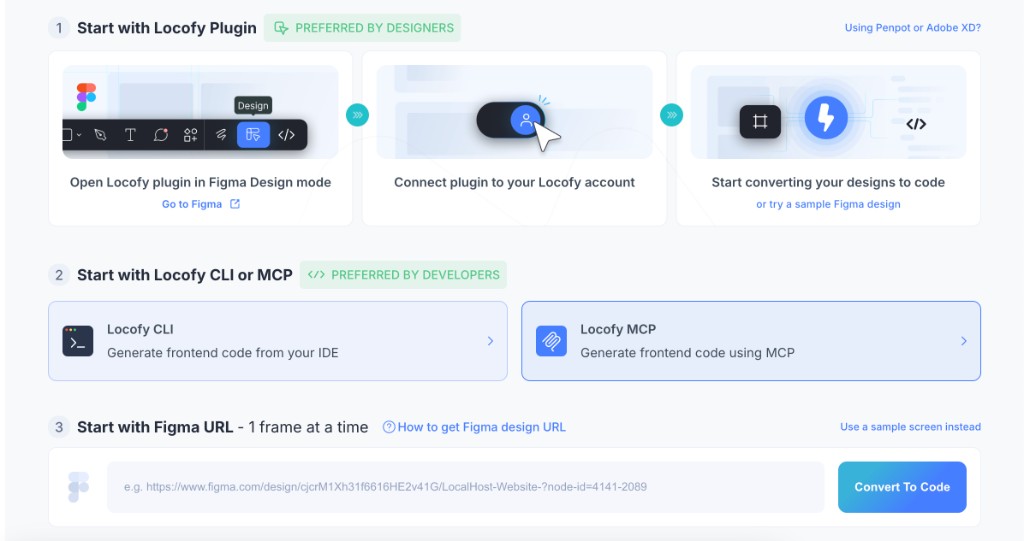
Open the Locofy Dashboard get-started page.
Under Start with Locofy CLI or MCP, click Locofy MCP — Generate frontend code using MCP. This opens the How to use Locofy MCP setup guide.
Step 3: Connect to Figma
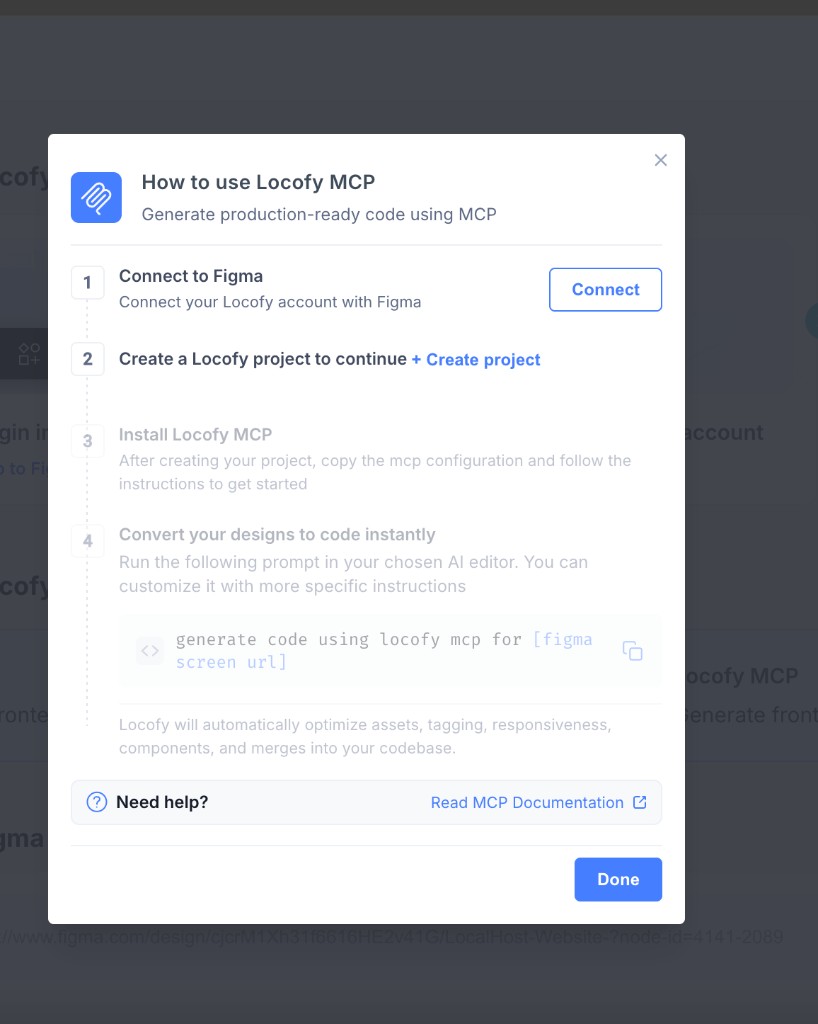
In the How to use Locofy MCP guide:
- Under Connect to Figma, click Connect.
- Log in to your Figma account and allow access to Locofy when prompted.
Once connected, the step shows You're Connected.
Step 4: Install Locofy MCP
After connecting Figma, create a Locofy project and install MCP in your AI editor:
- Click + Create project in the setup guide.
- Open MCP Configuration and copy your Personal Access Token and Project ID.
- Select your code editor and run the Run in Terminal command from the dashboard.
See Installing MCP in different IDEs for the full setup flow, including MCP Configuration screenshots and editor-specific instructions for Claude Code, Cursor, GitHub Copilot, and Windsurf.
Step 5: Generate & merge code with your first screen
When setup is complete, the dashboard shows a ready-to-use prompt. Run it in your AI editor—customize it with more specific instructions if needed.
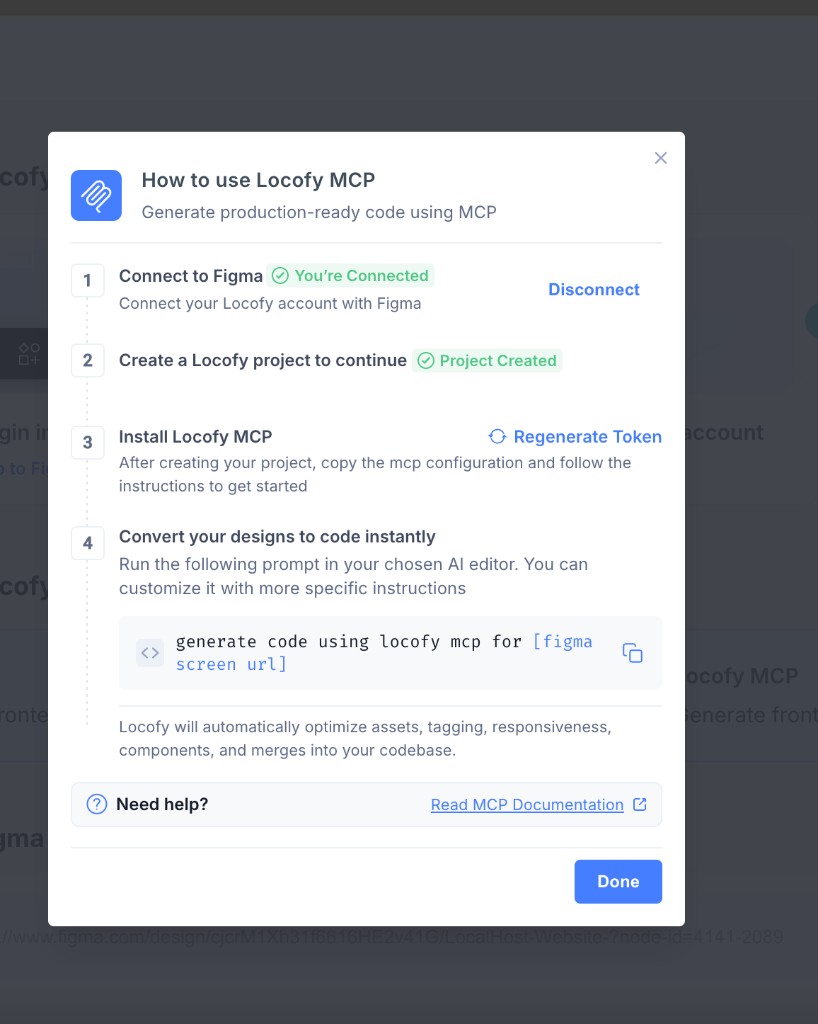
generate code using locofy mcp for [figma screen url]Replace [figma screen url] with your Figma file or frame URL.
Locofy automatically optimizes assets, tagging, responsiveness, and components, and merges the output into your codebase.
Locofy analyzes the design and generates frontend code using its Large Design Models (LDMs). During this process, Locofy understands:
- Components
- Design systems
- Variables
- Layout structures
- Responsive patterns
- Visual hierarchy
This helps generate frontend code that is much closer to how developers actually build applications.
Locofy supplies design-aware code through MCP tools, and the AI coding assistant present in your IDE merges that output into your codebase—respecting the base code, file structure, and conventions already in your project instead of overwriting it.
Step 6: Refine code with AI
Once code is generated, use natural language prompts to improve overall frontend code quality—fix structure issues, tighten accessibility, polish styling, and align output with your team's conventions.
For example:
Improve accessibility — add ARIA labels and ensure keyboard navigation worksAdd dark mode support to this componentConvert the header into a reusable component with props for the title and linksYou can keep iterating without switching tools or leaving your development environment.
Combine Locofy with your AI coding tools
Locofy focuses on understanding designs and generating high-quality frontend code. Your AI coding assistant then helps extend, customize, and maintain that code.
This gives you the best of both worlds:
- Locofy's Large Design Models for understanding designs
- AI coding assistants for extending and refining code
Together, they create a seamless design-to-code workflow directly within your preferred development environment.
Improve code quality
The quality of code Locofy MCP generates depends on how your Figma design is structured—and how you refine the output with your AI assistant. Well-structured designs produce cleaner, more predictable code. If the initial output needs work, use prompts in your IDE to fix responsiveness, layout, and structure without leaving your development environment.
Refine specific sections with prompts
You don't need to fix an entire screen in one pass. In any MCP-compatible AI coding tool, select or reference the specific section you want to improve—such as a component, file, or code block—then describe the change in your prompt. Your assistant applies the update in context of the rest of your project.
Responsiveness improvements
When prompting for responsiveness, be specific about what should change at each breakpoint:
- Layout — stack columns vertically on mobile, reflow grids, and prevent horizontal overflow
- Spacing — adjust padding and gaps so sections breathe on tablet and mobile
- Typography — scale font sizes and line heights for smaller screens
- Navigation — collapse menus into a hamburger or drawer on mobile
- Images and media — scale, crop, or switch aspect ratios so assets don't break the layout
- Visibility — hide or simplify non-essential elements on smaller breakpoints
- Touch targets — ensure buttons and links are large enough to tap on mobile
For example:
Make this hero section responsive — stack the text and image vertically on mobile, reduce padding, and scale down the headingFix the navigation bar for mobile — use a hamburger menu below 768px and keep the desktop layout unchangedMake this card grid responsive — 3 columns on desktop, 2 on tablet, and 1 on mobile with consistent gapsOverall frontend code quality
You can also prompt for broader structural and code-quality improvements:
- Component structure — extract repeated markup, remove redundant wrappers, and split large components
- Layout fixes — replace fixed dimensions with flexible layouts, fix overlaps, and clean up spacing
- Accessibility — add labels, ARIA attributes, keyboard focus styles, and error states
- Code conventions — align naming, file structure, and patterns with your existing codebase
For example:
Clean up this component — extract repeated markup, use semantic HTML, and follow our project's naming conventionsImprove accessibility in this form — add labels, error states, and keyboard focus stylesRefactor this layout to use CSS Grid with proper responsive breakpoints instead of fixed widthsPrompting best practices
- Start with high-level improvements — fix overall page responsiveness and layout before smaller details
- Be specific — describe the exact behaviour you want at each breakpoint instead of vague requests like "fix this"
- Narrow the scope — target one section at a time for more predictable results
- Add context when helpful — reference screenshots, design examples, or existing components in your project
- Refine your prompt — if the result isn't right, adjust the instructions or scope rather than repeating the same request
Start with the sections that need the most work, then iterate until the full screen meets your standards.
When to use Locofy MCP
Locofy MCP is recommended when:
- You already use AI coding tools such as Cursor or Claude Code
- You want to generate code directly from your AI assistant
- You want to avoid switching between multiple tools
- You want to combine design-to-code with AI-assisted development
- You want a fully integrated design-to-code workflow inside your development environment
What's next
| Goal | Doc |
|---|---|
| Set up MCP in your IDE | Installing MCP |
| Map Figma components to your codebase (developer + designer handoff) | Design System |
| Improve code quality | Improve code quality |
Prefer the terminal? See Locofy CLI. Prefer a browser workflow? See Import from URL.