Quickstart - CLI
Convert a Figma design to frontend code from the terminal—install the CLI, generate code, refine in interactive mode, and continue development.
Locofy CLI is designed for developers who prefer working directly from the terminal and want to bring design-to-code workflows into their existing development process.
This workflow is ideal if you spend most of your time in tools like Cursor, Claude Code, Windsurf, VS Code, or the terminal. Instead of installing a Figma plugin or working from the browser, you can generate, refine, and export frontend code directly from the command line.
Before you start
Copy the Figma URL of the screen you want to convert—you'll pass it to the locofy convert command.
You no longer need to manually share your Figma file with Locofy. Locofy uses your account's Figma connection to access designs. If access is needed during conversion, your browser opens so you can log in and allow Figma access.

Step 1: Create your Locofy account
Go to Locofy.ai and click Get Started. You can sign up with Google, GitHub, or email, then complete onboarding (name, role, and how you plan to use Locofy).
Your Locofy account links the CLI to your projects and generated code.
Step 2: Select the CLI workflow
Open the Locofy Dashboard get-started page.
Under Start with Locofy CLI or MCP, click Locofy CLI — Generate frontend code from your IDE. This opens the How to use Locofy CLI setup guide.
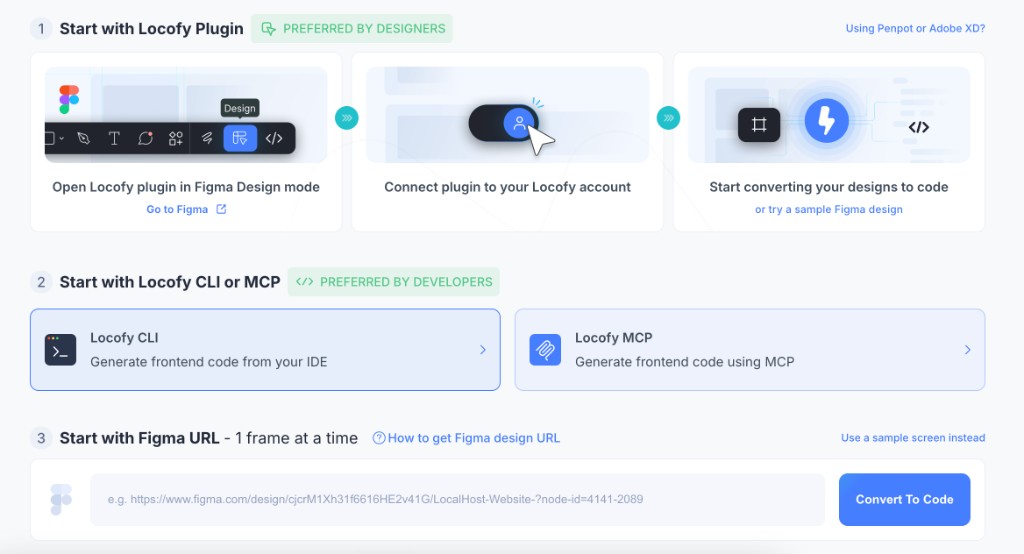
Step 3: Connect to Figma
In the How to use Locofy CLI guide:
- Under Connect to Figma, click Connect.
- Log in to your Figma account and allow access to Locofy when prompted.
Once connected, the button shows Connected.
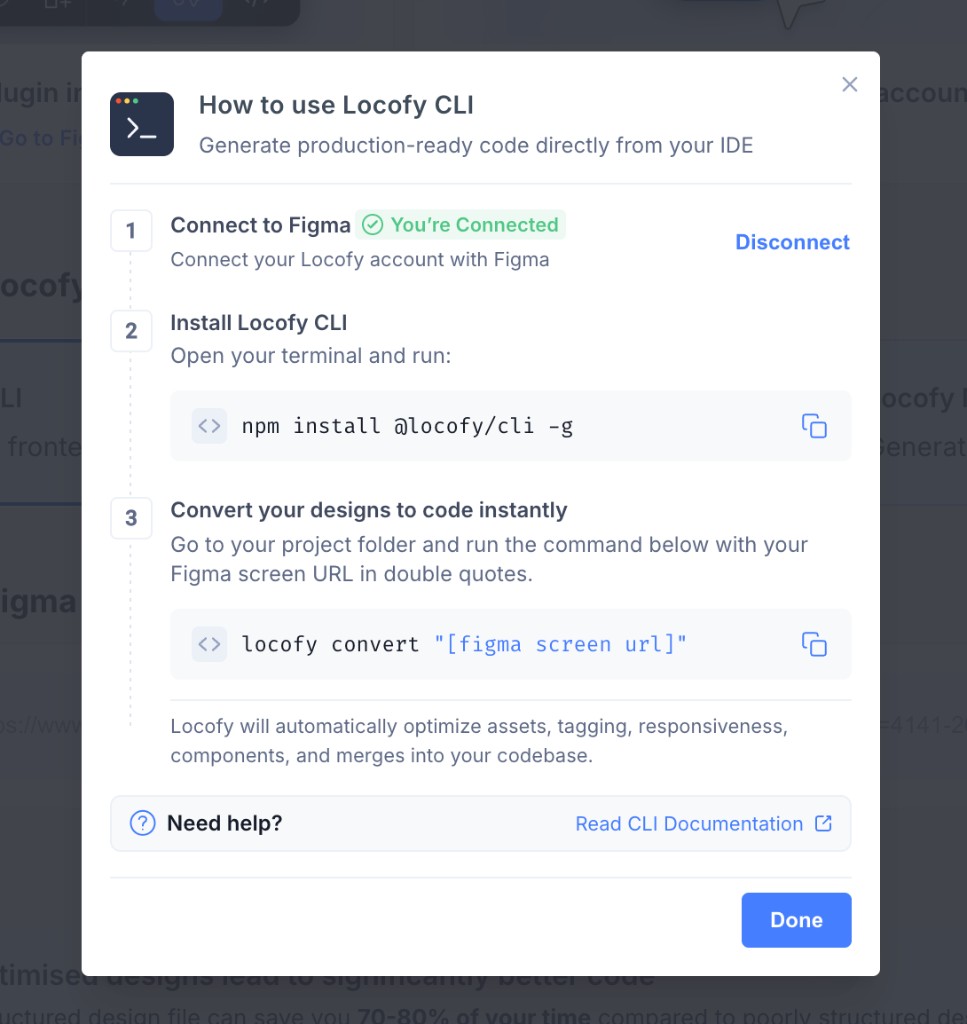
Step 4: Install Locofy CLI
Open your terminal and run:
npm install @locofy/cli -gAuthenticate the CLI with your Locofy account:
locofy loginYou'll be redirected to the Locofy website. Sign in, then return to the terminal—the CLI will show a connected state. To sign out later, run locofy logout.
Step 5: (Optional) Connect your custom components
If your project uses a custom component library, connect it before generating screens so Locofy can map Figma components to your existing code.
In your terminal:
- Navigate to your project root.
- Run
locofy initto create alocofy.config.jsonfile. - Run
locofy pushto upload your component library to Locofy.
In Figma (your designer): Custom component mapping also requires the Locofy plugin in Figma Design Mode. Ask your designer to open the design file, run the Locofy plugin, and click I have completed all the steps after your push so components appear for mapping. You do not need Figma access yourself—see Using Custom Code Components for the full developer ↔ designer handoff.
Step 6: Generate your first screen
Go to your project folder and run the convert command with your Figma screen URL in double quotes:
locofy convert "[figma screen url]"Replace [figma screen url] with your Figma file or frame URL.
Locofy automatically optimizes assets, tagging, responsiveness, and components, and merges the output into your codebase.
Locofy analyzes the design and generates frontend code using its Large Design Models (LDMs). During this process, Locofy understands:
- Components
- Design systems
- Variables
- Layout structures
- Responsive patterns
- Visual hierarchy
This helps generate frontend code that is much closer to how developers actually build applications.
Step 7: Interactive Mode
Once code generation completes, the CLI enters Interactive Mode automatically. Instead of manually editing files, describe the changes you want using natural language prompts.
For example:
Add dark mode support to this screenImprove accessibility for all form inputsConvert the header layout into a reusable componentLocofy applies the changes and updates the generated code accordingly. You can also drag-and-drop screenshots, existing code files, or markdown specifications into the terminal for additional context.
Read more in Interactive Mode.
Step 8: Using skills
Skills extend what the CLI can do during Interactive Mode—built-in skills cover common improvements, and custom skills let you encode your team's standards and patterns.
- See Using skills for how to use skills in Interactive Mode.
- Run
locofy skills installto add editable skills to your project. - Create custom skills for team-specific conventions like styling migrations or component standards.
Step 9: Continue development
Once you're happy with the generated output, continue developing using your preferred workflow. The generated code can be:
- Committed to GitHub
- Opened in your IDE
- Extended using AI coding assistants
- Integrated into an existing codebase
Because Locofy operates directly from the command line, it fits naturally into modern AI-assisted development workflows.
When to use Locofy CLI
Locofy CLI is recommended when:
- You prefer working from the terminal
- You want to generate code without using the Figma plugin
- You want a developer-first workflow
- You want to refine generated code using prompts
- You want to integrate design-to-code directly into your existing development process
What's next
| Goal | Doc |
|---|---|
| Refine code with prompts | Interactive Mode |
| Use built-in and custom skills | Skills |
| Map Figma components to your codebase (developer + designer handoff) | Design System |
| Improve structure and code quality | Improve code quality |
Prefer a browser-based workflow? See Import from URL. Prefer working inside Figma? See the Plugin quickstart.